RadLab: Tutorials
RadLab 1-Minute Walkthrough
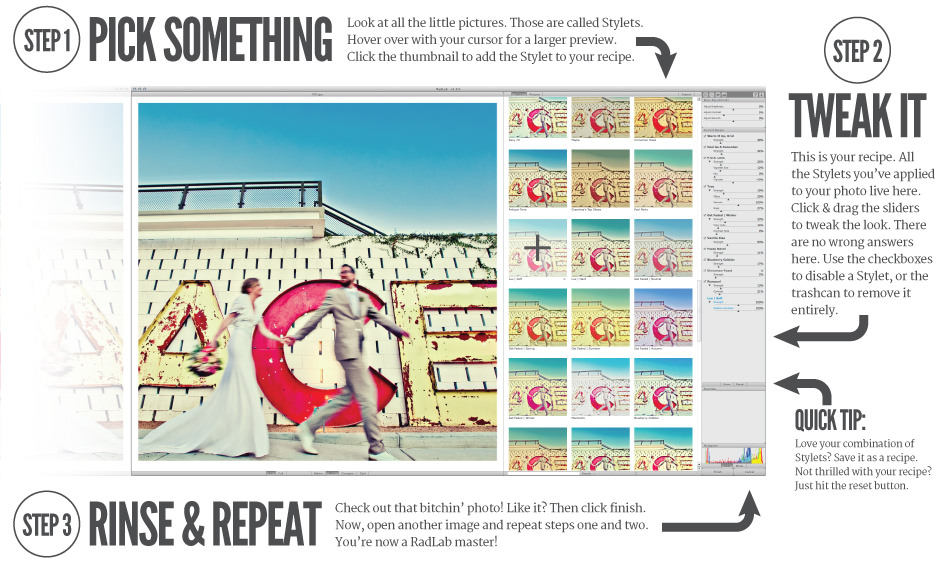
How to use RadLab in three easy steps. You can literally learn how to re-work your images using RadLab in one minute. It’s that easy.
RadLab Quickstart Guide - RadLab in 60 seconds
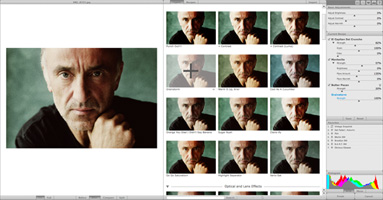
Load up an image in Photoshop and click the beaker icon in the RadLab Launcher to open RadLab. Follow these three easy steps to find the perfect style for your photo.
Easy Masking with RadLab
For this week’s tutorial Jeremiah breaks down a FAQ. He takes us through easy layer masking with RadLab.
Importing and Exporting Recipes
How to import recipes into RadLab.
A quick and easy guide to importing and exporting RadLab recipes.
RadLab and Photoshop Actions
If you prefer one-click access to your favorite recipes, need to do batch processing, or just plain like the Photoshop actions palette, you can use RadLab as part of a Photoshop Action.
RadLab is technically just a Photoshop filter, just like anything else in the Filter menu (though a very fancy one). This means that if you record an action, then run RadLab, it will be recorded in the action just as if you were doing anything else in Photoshop.
To learn how to use Photoshop Actions with RadLab, check out this brief video
Why use actions with RadLab?
There are a couple of distinct advantages of using RadLab’s Stylets in the place of our Photoshop Actions. For instance, if you wanted to run Old Skool on a photo:
- RadLab is MUCH faster than the action equivalent
- RadLab will give you the same results regardless of what size photo you want
- RadLab lets you tweak and customize the behavior of a Stylet, unlike actions, which are difficult and error-prone to customize
Non-Destructive Editing With Smart Objects
Since RadLab is a Photoshop Filter, it’s possible to take advantage of Photoshop’s Smart Filters feature to allow true non-destructive editing of your images. Smart Filters and Smart Objects allow you to change the RadLab recipe you’ve applied, even after you’ve exited RadLab and performed additional work in Photoshop.
Without the RadLab Panel
- Copy a merged version of your document to a new layer. The shortcut key Cmd-Shift-Option-E will do this for you (Ctrl-Shift-Alt-E on Windows).
- From the Photoshop menu, select Layer -> Smart Objects -> Convert To Smart Object
- Run RadLab via Filter -> Totally Rad -> RadLab
RadLab also makes using Smart Objects a one-click operation for Photoshop CS4 and CS5 users. Here’s how you do it:
Via the RadLab Panel
- Make sure your RadLab Panel is visible (CS4 and CS5 users only)
- Select “New Smart Object” from the drop-down menu
- Click “Open RadLab”
That’s it. A new Smart Object will be created with your recipe, making it easy to later edit or mask the result.
Editing Your Recipe Later
When you apply a filter, like RadLab, to a Smart Object, you get a Smart Filter entry below that Smart Object in the layers palette. You can double-click on the RadLab entry in the list of Smart Filters to bring up the RadLab interface and make changes to your recipe. When you click Finish, your image in Photoshop will be updated with the new Recipe from RadLab.
Batch Processing With RadLab
You can use Photoshop to run a batch of images through RadLab. The workflow is very similar to batch processing with actions. Here’s how you do it.
1. Create An Action
Photoshop’s Batch and Image Processor commands can only run actions, so the first thing you’ll need is a Photoshop Action.
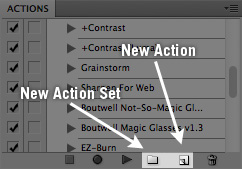
Head over to your actions palette. Actions need to live in an Action Set, so unless you already have one set up for your own actions, start by clicking the folder icon to create a new Action Set. Then click the New Action button. Give it a nifty name. When you click the Record button to create your action, Photoshop will start paying attention to everything you do, and will record it in an action.
2. Run RadLab With Your Recipe

Head to the Filter menu (NOT the RadLab Launcher Panel). Re-work your photo to your liking. Whatever adjustments you apply to this image will be encapsulated in your action, allowing you to apply your recipe to bunches and bunches of images. You can load a saved recipe or make one up as you go. When you hit “Finish”, the recipe you’ve just applied to this photo will be baked into the action, ready to go.
3. Finish Recording Your Action
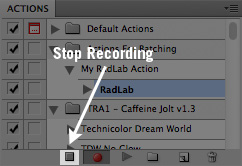
When you’re done in RadLab, click the Stop Recording button in the Actions Palette (otherwise, your action will keep recording everything you do, and will be a giant mess).
4. Queue Up A Batch
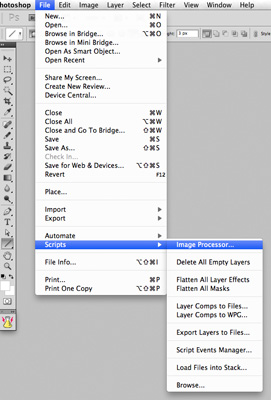
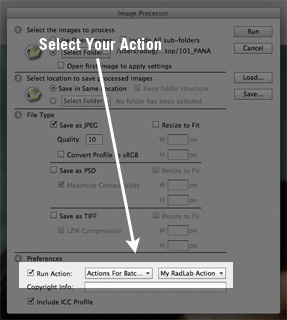
Finally, head to File -> Scripts -> Image Processor. Choose the folder of images you’d like to process, select where you want to save them, and choose a file format for the output. Near the bottom, you can select an action to run on each photo. Choose the action you just created.
Hit Run, and RadLab’s magic will be applied en masse to the entire folder of images. Congrats! You’re now a certified Level 2 Workflow Ninja!