RadLab: Recipes
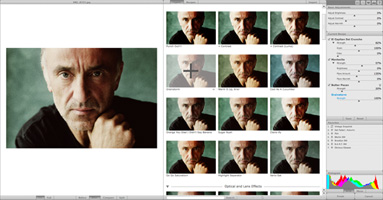
All of the Stylets that you apply to an image, along with any Stylet parameter tweaks, are the Recipe for that photo. The Recipe for the current photo is shown in the Recipe panel on the right. Any time you add a Stylet, it appears in the Recipe panel, and when you preview a Stylet or Recipe by hovering your mouse over it in the Library, the Recipe panel changes to show what the current image’s Recipe would be if you clicked.
Recipes are applied from top to bottom, just like a list of things to do. The Basic Adjustments are also part of the current recipe, though they have their own special panel. The Basic Adjustments to Brightness, Contrast, and Warmth are applied before any Stylets.
Modifying The Current Recipe
- Add to the current recipe by clicking on a Stylet in the Library.
- Delete a Stylet in the current Recipe by clicking the trashcan icon next to that Stylet in the Recipe panel.
- You can show additional controls for a Stylet (if a Stylet has more than one) by clicking the triangle underneath the Stylet name in the Recipe Panel.
- Change the parameters of the Stylets in the current Recipe with the sliders.
- You can enable or disable a Stylet from a Recipe without removing it by clicking the checkbox beside the Stylet name.
Saving and Sharing Recipes
One of the coolest parts of RadLab is the ability to save, export, and share recipes. You can send your RadLab recipes to other users, and import recipes you’ve downloaded to use yourself. It’s super-easy to do, and here’s how it works.
1. Work Some Magic
Open up RadLab and work some post-processing magic. Add, remove, and tweak Stylets until you have a recipe you’re proud of.
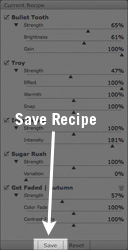
2. Save It
Before clicking Finish, click the Save button at the bottom of your Recipe panel. Give your recipe a name (something original, colorful, inspiring, and yet descriptive and functional… no pressure!)
If you forget to hit Save before exiting RadLab, you can always open RadLab again, and choose the last item in your Recipe History. This will load your recipe up, which you can then save permanently with the Save button (your history only remembers the most recent recipes).
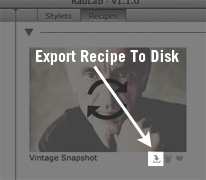
3. Export It
Click over to the recipe tab in your library, and find your fancy new recipe. Hover your mouse over the recipe thumbnail, and you’ll see some icons appear below it. Click the Export icon (with the arrow pointing down).
Choose a location to save your recipe to on your computer.
4. Share the Magic
Your recipe is now wrapped up into a single file, with a .rls extension. Send it to a friend, or share it with the world.

Importing Recipes
- Download and extract your recipes to your computer (if necessary).
- Open RadLab.
- Click the “Import” button at the top of the RadLab Library.
- Navigate to where you saved your recipes on your computer and select the recipes you’d like to import.
Check out this video that explains the process in one minute.
Using The Keyboard
You can use your keyboard to navigate the Recipe Panel and change settings. Click on a Stylet name to select it. The currently active Stylet will have its name italicized. Use the up and down arrow keys to select different parameters, and the right and left arrow keys to move the sliders. Holding the CMD key (CTRL on Windows) while using the left / right arrows will make sliders move in increments of 1.
You can also press Enter to type a value for a slider directly into the box. Pressing enter again confirms the new value.
Backing up your RadLab recipes?
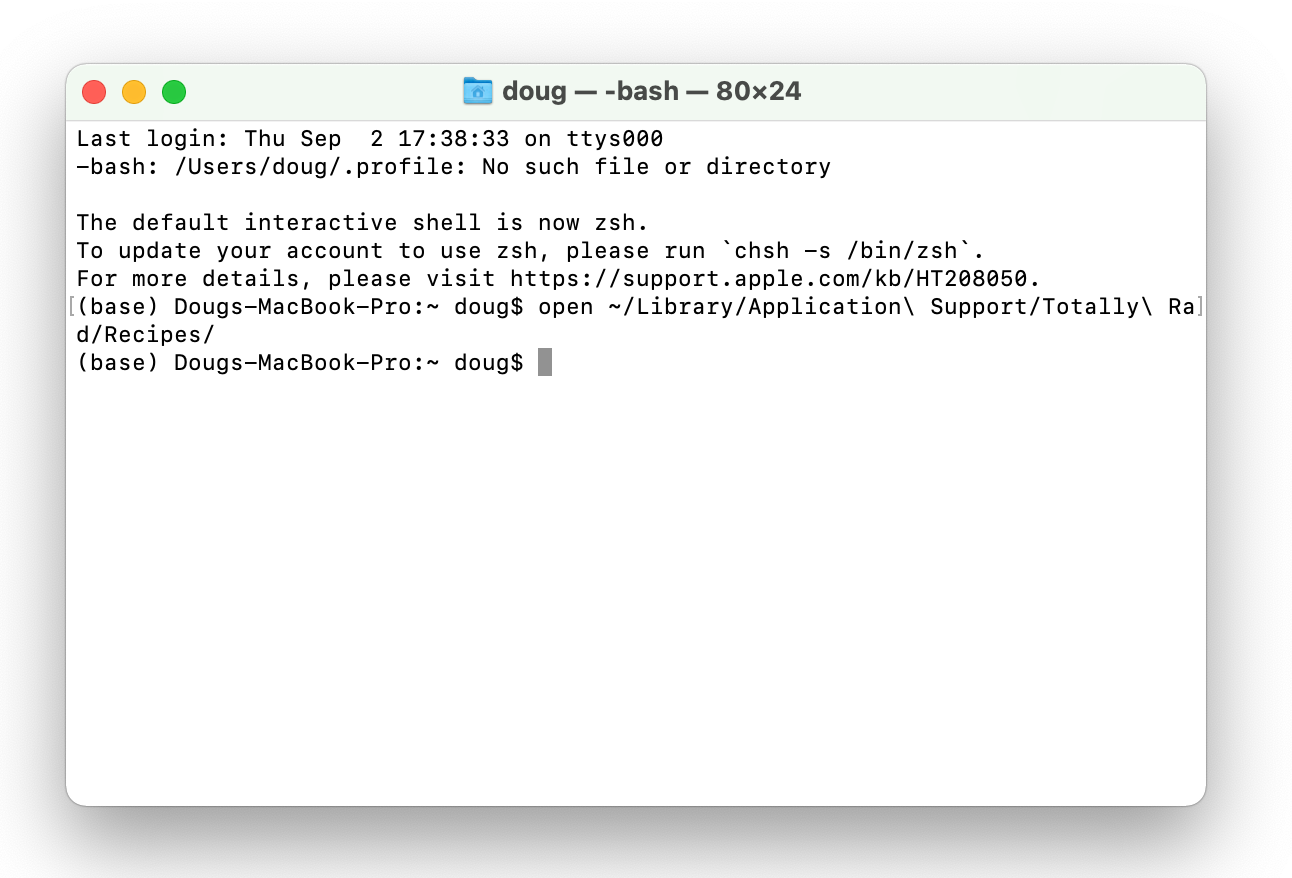
RadLab’s recipes live in a folder that’s hidden by default, so making a copy for backup purposes can be tricky.
On a Mac
-
Open Terminal
-
Type the following command and press Return
open ~/Library/Application\ Support/Totally\ Rad/
- Copy the Recipes folder from the Finder window that just opened to somewhere safe
RadLab Recipe Packs
Over RadLab’s lifetime, we’ve released several recipe packs with original and user-generated processing recipes. You can download them here: